Tickets
What can the Ticket System do?
The Ticket System lets your users get in touch with the team. You can create multiple ticket panels for different areas. A panel is shown in a channel where users can choose the fitting category. After that, a dedicated ticket channel is created automatically. Only the ticket creator and the team members set up for the selected category can see it.
Setup
Create panel
The Ticket module supports multiple ticket panels. A ticket panel looks like this, for example:
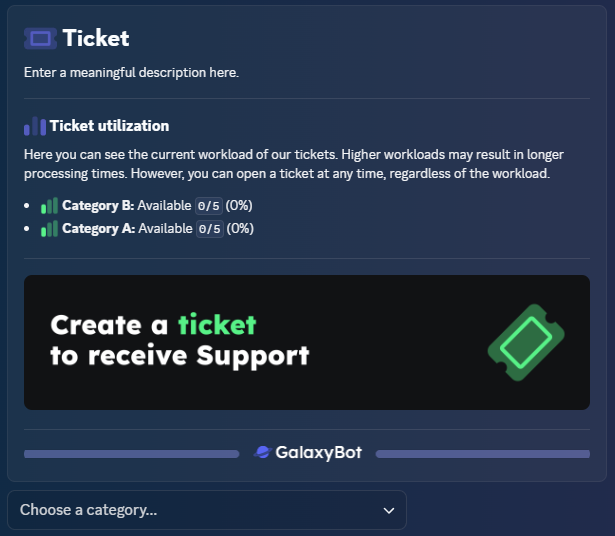
A ticket panel has multiple categories, for example Support or Bugs. Multiple panels are useful when you want to send them into different channels.
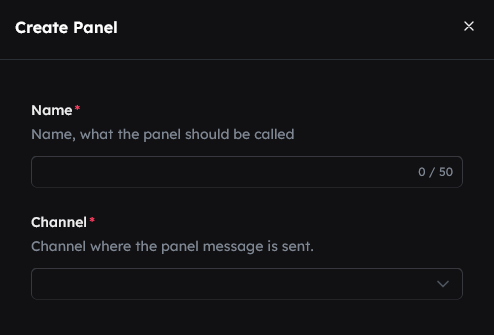
To create a new ticket panel, click Create new panel.

Next, you need to set a Name and a Channel for the panel. You can change both settings later. In this example, we use Panel 1 as the Name and panel-1-embed as the Channel.
Configuration structure
A ticket panel configuration is split into 8 sections. We go through all of them from left to right.

General
Now let's look at the first section. Here you can find general settings, such as ticket naming format or limits for how many tickets a user can create at the same time.
Mention team
 If you want your team members to be automatically pinged in a new ticket, you can enable this. The ping message is deleted automatically, so do not worry if you cannot see it. We recommend this option.
Concurrent ticket limit
You can define how many tickets a user can have open at the same time. If the limit is reached, the user cannot create a new ticket until one of their current tickets is closed. If you do not want to use this, keep it at 0 to allow unlimited tickets.
Restrict ticket closing
If you want only your team members to close tickets (and not the ticket creator), enable this setting. If users should be able to close their own tickets, keep this set to off.
Action when leaving
Next, you can define what should happen if the ticket creator leaves the server. You have 3 options:
- Do nothing: No action is performed
- Delete: The ticket is closed automatically
- Info message: A message is posted in the ticket that the creator has left the server. The ticket remains open until it is closed manually.
We recommend either sending an info message or closing the ticket automatically.
Allow adding more users
With Allow adding more users, you can decide whether the ticket creator can add more users to their ticket using /ticket add.
Format
Finally, set the format for ticket channel names. The Prefix is configured later in ticket categories and should be a short version of the category name. If you have a category called Bug Report, a good prefix could be bug. There are 4 format options. If your server uses a custom channel style with emojis, we recommend Custom.
%PREFIX%-%USERNAME%. If the user name is pluto and the selected prefix is bug, the ticket name will be bug-pluto.%PREFIX%-%USER_ID%. If the user ID is 821835831844012103 and the selected prefix is bug, the ticket name will be bug-821835831844012103.%PREFIX%-%USER_NICK_NAME%. If the nickname is Pluto Plushie and the selected prefix is bug, the ticket name will be bug-pluto-plushie.👋 » channel-name, you can set the ticket format to 👋 » %PREFIX%-%USERNAME%. In that case, a ticket opened by pluto with prefix bug would be named 👋 » bug-pluto.Supported placeholders:
Embeds
 Now set up the embeds for the ticket panel. This embed is used for all ticket categories in this panel, but can optionally be overridden in a category. For more information about the embed editor, see here.
Panel embed
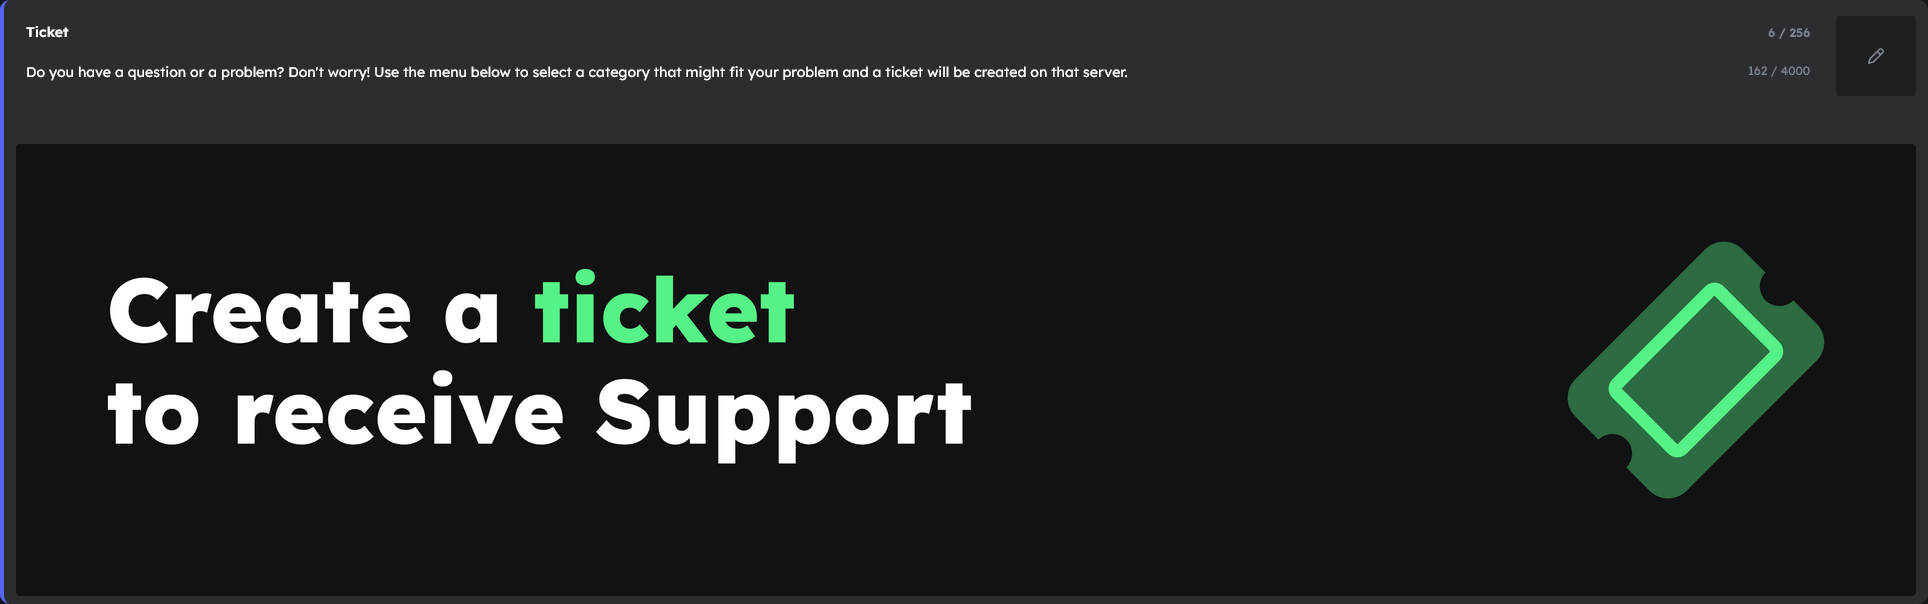
The Panel Embed is the embed sent in the ticket panel channel. It includes ticket category information and a dropdown to create a new ticket. This is required. In this example, we set Ticket as the Title and
Do you have a question or a problem? No worries! Use the menu below to choose the category that matches your issue, and a ticket will be created on this server.
as the description. You can also upload an image optionally. After setup, it should look roughly like this:
Opening embed
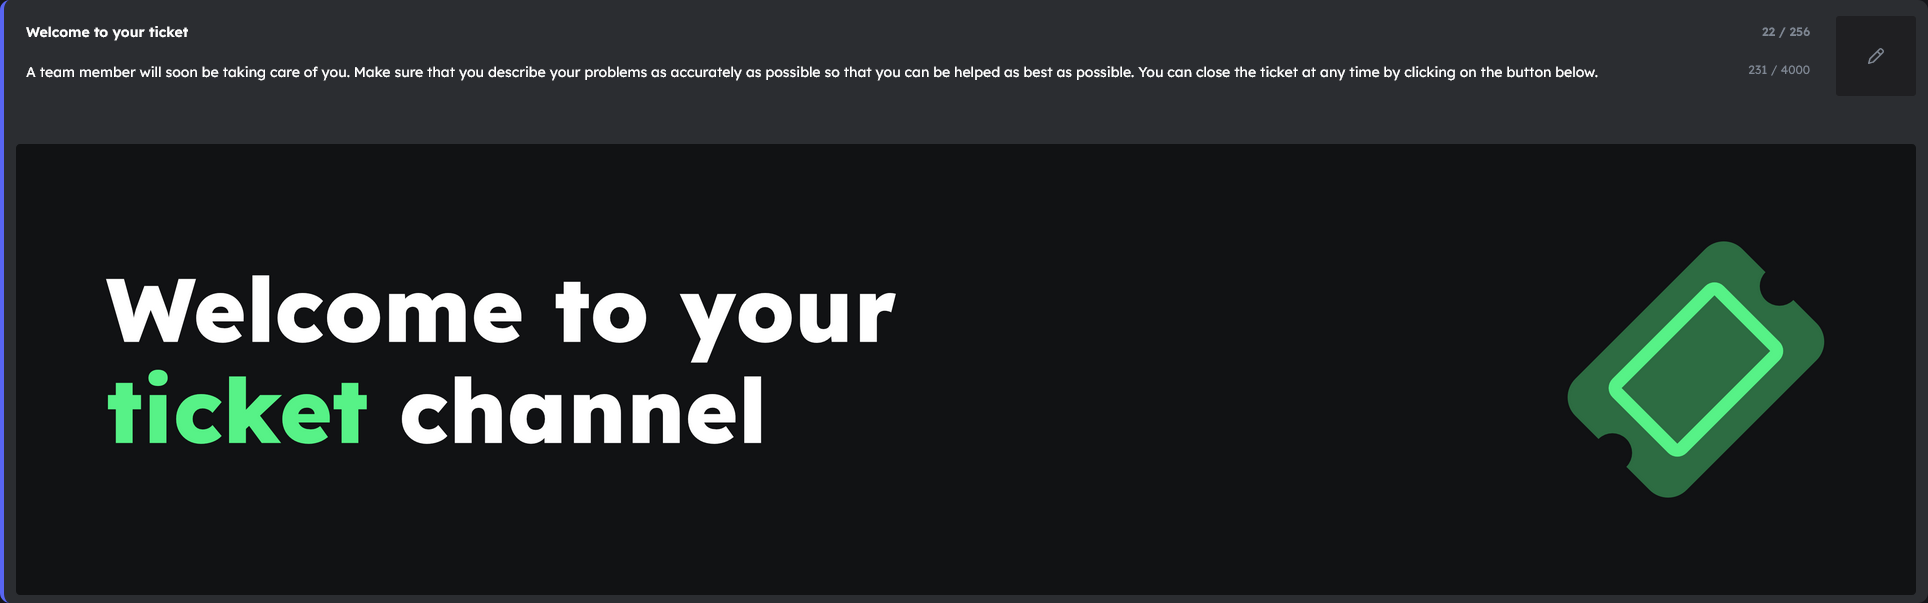
Similar to the panel embed, this embed is sent in the ticket channel when a ticket is created. This is also required. In this example, we set Welcome to your ticket! as the Title and
Thanks for creating a ticket! A team member will help you as soon as possible. In the meantime, you can add more details here so we can support you faster.
as the description. You can also upload an image optionally. After setup, it should look roughly like this:
Categories

Now we configure categories. In this example we create only one category, but you can create as many as you want.
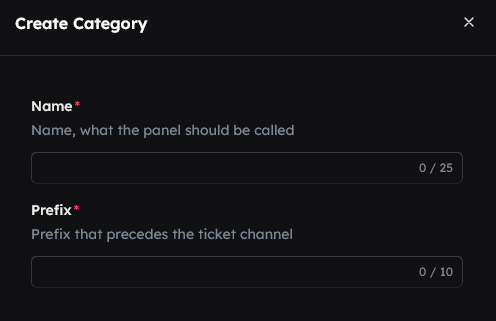
Create new category
To create a new category, click Create new category.

Next, you need to set a Name and a Prefix for the category. You can change both later. The prefix should be a short form of the category name. If your category is called Bug Report, for example, you can use bug as the prefix. The prefix is used in the ticket channel name. In this example, we set the name to Bug Report and the prefix to bug.
Category settings structure
Like the rest of the ticket module, this area has 6 tabs with configuration settings. We go through all of them from left to right.

General
Let's first look at the general configuration.
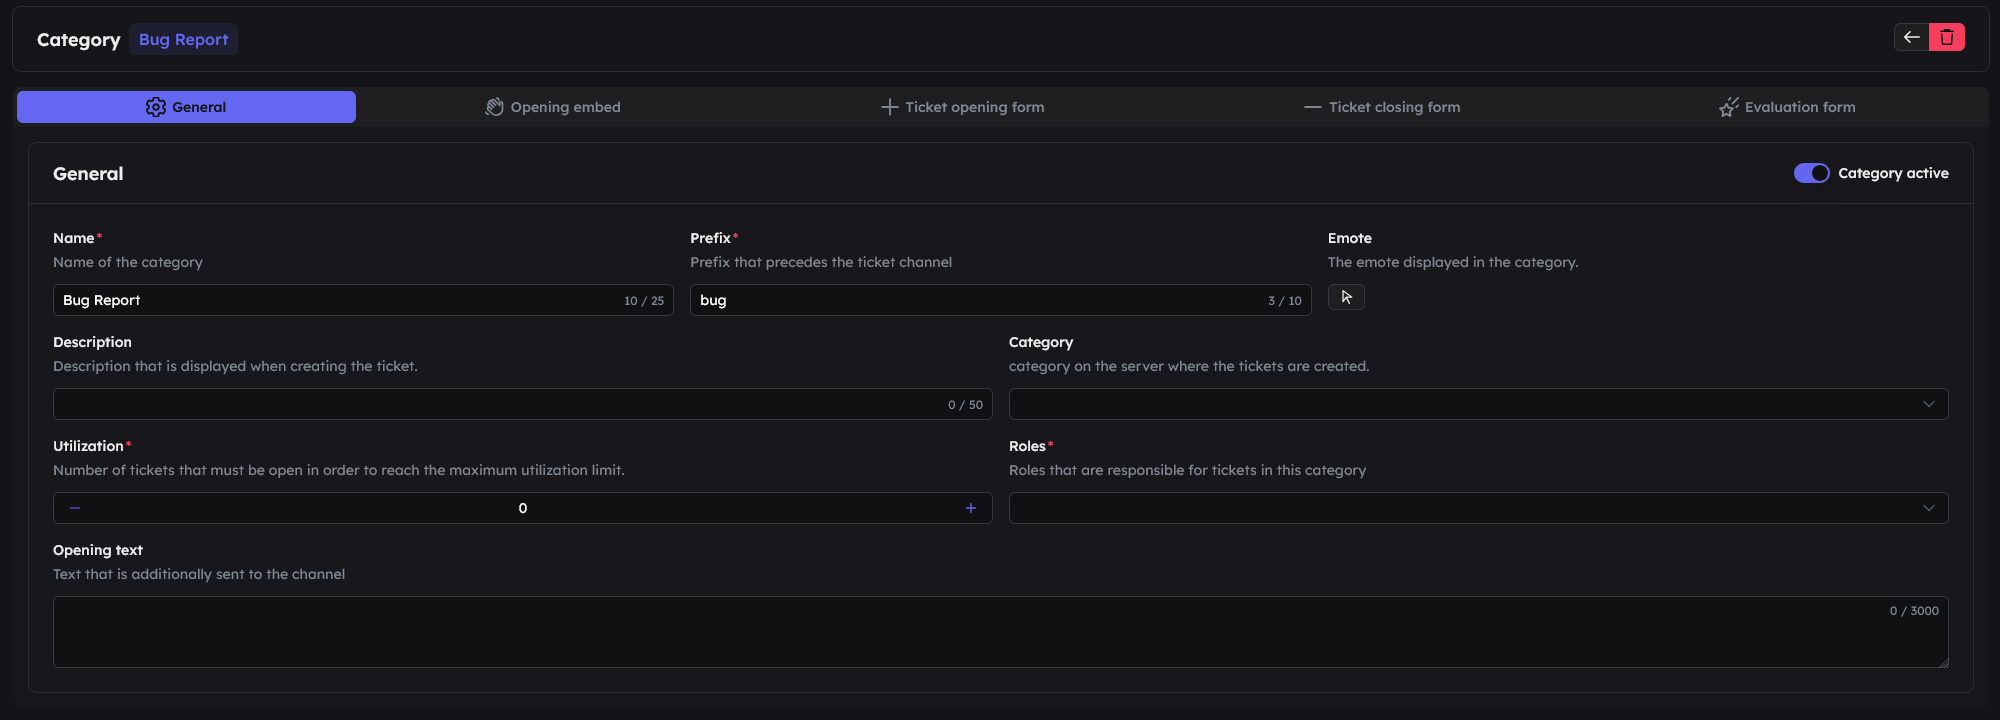
Category active
Use the toggle to define whether this category is shown in the dropdown.
Name
This is your category name. Users see it when they open a ticket. (Required)
Prefix
The prefix is used in the ticket channel name. If your category is called Bug Report, for example, you can set the prefix to bug. In this example, we set the name to Bug Report and the prefix to bug. (Required)
Emoji
Any emoji you want, shown in the dropdown. This is optional, but if you set an emoji for one category, it is recommended to set emojis for all categories to keep the dropdown consistent.
Description
A short description of your category, shown to the user in the dropdown.
Category
The Discord category where new tickets should be created. If no category is selected, tickets are created without one, but we recommend choosing a category.
Utilization
Optionally define a utilization limit from which your category is considered busy. The utilization is shown in the panel message. For example, if you set utilization of 10, the utilization indicator turns yellow at 8 tickets and red at 10+ tickets. You can set any value. It turns yellow at 80% and red at 100%. If you set utilization to 0, the utilization indicator is hidden.
Roles
Here you have to select the roles that can manage tickets in this category. Multiple roles can be selected.
Allow on behalf
Allow team members to use /ticket onbehalf to open tickets on behalf of a user for this category, even if they do not have permissions for this category themselves. For example, a team member from another area can open a ticket in this category on behalf of a user.
Override opening embed
With Override opening embed, you can decide whether this category should use a custom opening embed. If disabled, the opening embed from the Embeds tab is used. If enabled, you can fill out the embed below to define a category-specific opening embed.
Ticket open form
With Ticket Open Forms, you can create your own forms that users must fill out when creating a ticket in this category. For example, you could ask What is your issue? and as a second question What have you already tried to solve it?. If you do not want to ask questions, do not create form fields.
Create form field
To create a form field, click Create form field.

Setup
Next, configure the form field. You can create multiple fields. Available settings:
- Name: The field name, e.g.
What is your issue?. - Field type: There are 4 field types:
- Single-line text: For short answers without line breaks.
- Multi-line text: A text area with multiple lines for detailed answers.
- Option select: See step 3.
- File: Allows the user to upload a file.
- Required: Define whether filling out this field is required to create the ticket.
Type - Option select
If you set the field type to Option select, you need to configure options. Click Add option to create one. You must create at least 1 option for option select to work. Available option settings:
- Emoji: Any emoji shown in the dropdown.
- Name: The option name shown in the dropdown.
Character limit
If the field type is Single-line text or Multi-line text, define a minimum and maximum number of characters. Default is minimum 1 and maximum 3000 characters.
Ticket close form
With Ticket Close Forms, you can create forms that are filled out when closing a ticket in this category. For example, you can ask Was your issue solved? and as a second question Do you have feedback for us?. If you do not want to ask questions, do not create form fields.
Create form field
To create a form field, click Create form field.
Setup
Next, configure the form field. You can create multiple fields. Available settings:
- Name: The field name, e.g.
What is your issue?. - Field type: There are 4 field types:
- Single-line text: For short answers without line breaks.
- Multi-line text: A text area with multiple lines for detailed answers.
- Option select: See step 3.
- File: Allows the user to upload a file.
- Required: Define whether filling out this field is required to create the ticket.
Type - Option select
If you set the field type to Option select, you need to configure options. Click Add option to create one. You must create at least 1 option for option select to work. Available option settings:
- Emoji: Any emoji shown in the dropdown.
- Name: The option name shown in the dropdown.
Character limit
If the field type is Single-line text or Multi-line text, define a minimum and maximum number of characters. Default is minimum 1 and maximum 3000 characters.
Rating form
With Rating Forms, you can create forms users must fill out when rating a ticket in this category. This is used when the user wants to rate a ticket and Enable ratings is set to on. For example, ask How satisfied are you with the solution? and as a second question How can we improve?. If you do not want to ask questions, do not create form fields.
Create form field
To create a form field, click Create form field.
Setup
Next, configure the form field. You can create multiple fields. Available settings:
- Name: The field name, e.g.
How satisfied are you with the solution?. - Field type: There are 4 field types:
- Single-line text: For short answers without line breaks.
- Multi-line text: A text area with multiple lines for detailed answers.
- Option select: See step 3.
- File: Allows the user to upload a file.
- Required: Define whether filling out this field is required to submit a ticket rating.
- Show publicly: Controls whether this field is shown in the public rating log. If disabled, the answer is only visible in the internal rating log.
Type - Option select
If you set the field type to Option select, you need to configure options. Click Add option to create one. You must create at least 1 option for option select to work. Available option settings:
- Emoji: Any emoji shown in the dropdown.
- Name: The option name shown in the dropdown.
Character limit
If the field type is Single-line text or Multi-line text, define a minimum and maximum number of characters. Default is minimum 1 and maximum 3000 characters.
Override automations
Here you can override the panel-wide automation settings specifically for this category. Each automation has a 3-state toggle:
- Enabled: The automation is enabled for this category.
- Disabled: The automation is disabled for this category.
- Inherit: The setting is inherited from the panel.
Rating
 If you want users to receive a DM after their ticket is closed asking how they liked the ticket support, you can enable the Rating module. This is also required if you enable a Rating form in a category.
Enable rating module
To enable the rating module, toggle Enable rating.
Channel
Next, select the channel where ratings should be sent. This is the internal rating log.
Public channel
Optionally select an additional channel where a message is also sent for every rating. This is the public rating log. If no channel is selected, no message is sent to a public channel.
Displayed values
Define which data should be shown in the public rating log, for example creator, category, or handling time. This setting only affects the public channel; the internal rating log always shows all data.
Automation
 To simplify ticket management, there are several automations you can enable.
Enable auto-close?
Enable this to close tickets automatically after a defined period of inactivity. You need to set after how many days the ticket is closed.
Enable auto-alert?
Enable this to automatically notify the ticket creator when the ticket is inactive. You need to set after how many minutes the alert is sent.
Enable auto-team-alert?
Enable this to automatically mark the responsible team member when the ticket has been inactive for a defined period. If the team member still does not respond afterwards, the ticket is automatically unclaimed after a further, separately configurable period.
Enable auto-unclaim?
Enable this to automatically unclaim a ticket when it is inactive. You need to set after how many minutes the ticket is unclaimed.
Automatically close ticket if creator does not respond?
Enable this to close the ticket automatically if the creator does not respond after the auto-alert.
Enable auto-claim?
Enable this to automatically claim the ticket when a team member sends a message.
Automatically close ticket after close request?
Enable this to close the ticket directly once the close request is completed.
Logs
If you want all ticket actions to be logged in a specific channel, you can configure this here.
Log ticket activities
Enable this so ticket activities are logged. If enabled, you must select a channel where the logs are sent.
Channel
Select the channel where ticket changes should be logged.
Enable ticket transcripts
Enable this to create a transcript after a ticket is closed. This transcript includes all messages and interactions in the ticket and can later be viewed in the Team Dashboard.
Claim category
 If you want claimed tickets to be moved into another category, you can configure this here.
Enable claim category
Enable this so tickets in this panel are automatically moved to another category once they are claimed.
Category
Select the category where claimed tickets should be moved. This is the category all claimed tickets are moved to automatically.
Send panel
As a final step, you need to send the panel to your channel. Click 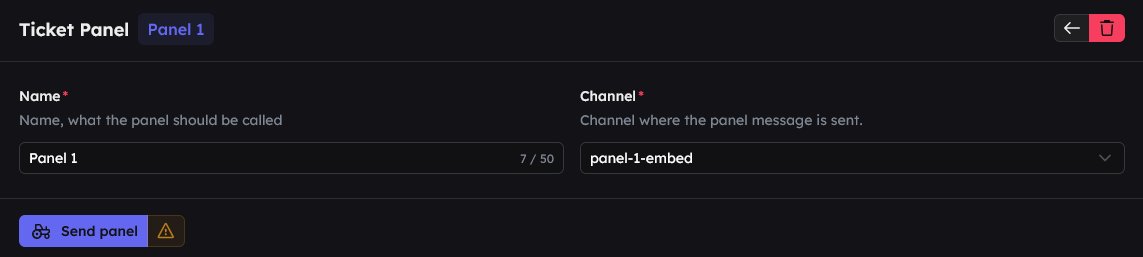
Commands
/ticket close
Closes the current ticket. You can configure in the dashboard that only team members are allowed to do this.
/ticket closerequest
Sends a request to close the ticket. Both the person currently handling the ticket and the ticket creator must approve it.
/ticket forward
Forwards a ticket to another team member or role. This command has the parameter recipient, which includes these options:
/ticket rename
Renames the current ticket. The following information must be provided:
/ticket notes
Creates a private thread that only team members can see. You can use it to keep notes about the ticket, which are later also shown in the ticket transcript in the Team Dashboard.
/ticket disableautoactions
Disables all automations for the current ticket. The following information must be provided:
1 hour, 1 day, 1 week, or 1 month. If no duration is provided, the automations are disabled permanently./ticket alert
Pings the ticket creator with the information that their ticket will be closed if inactivity continues.
/ticket onbehalf
Creates a ticket on behalf of another user. Only team members can use this command. The following information must be provided:
/ticket claim
Takes ownership of a ticket and shows that you are now responsible for it.
You can also use the button in the container.
/ticket unclaim
Releases a ticket again and indicates that you are no longer responsible for it.
You can also use the button in the container.
/ticket add
Adds another person to a ticket. Note: If users should also be allowed to add people, this must be enabled in the dashboard. Team members can always add people. This information must be provided:
/ticket remove
Removes a user from the ticket. The following information must be provided: